Restoration of A carved and gilt wood chinoiserie wall cabinet with a pagoda top. Circa 1775.
1. Introduction & Provenance
Status: The cabinet was recently restored by a third party. The client was dissatisfied with the quality of that work and requested a formal assessment and conservation plan.
Historical Evidence:
Archival images from A History of English Furniture by Percy Macquoid confirm the cabinet was previously painted white and featured a mounted bird atop the pagoda canopy.
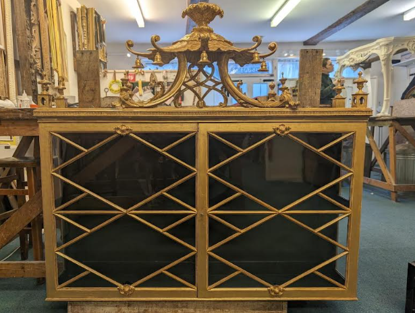
Recent online documentation from Adam Calvert Bentley shows the cabinet in its current form prior to this intervention.
2. Condition Assessment & Observations
Structure & Construction
Overall Frame: Structurally sound due to previous restoration work.
Canopy Top: Incorrectly fitted. It sat proud of the back instead of flush. Multiple poor-quality repairs were visible across the canopy surface.
Bells: Fixed rigidly to the canopy scrolls. Historically, these should be linked to swing freely.
Glazing Bars & Motifs: Only two carved motifs remained on the door glazing bars (originally four). Both were fixed in the incorrect positions.
Later Additions: A later Rococo-style foliate carving had been incorrectly seated on top of the canopy.
Surface & Finishes
Exterior Gilding: Flaking and unstable. A layer of recent gilding was applied over the original gesso and preparation layer without proper adhesion.
Underlayers: Traces of original gesso, yellow ochre, and gold size/bole survive beneath the modern paint. Dry-stripping tests confirmed the original gold layer could not be saved, but the original gesso remains intact.
Interior: Overpainted with a modern grey-green water-based paint. The original dark green water-based finish survives underneath.
3. Conservation Treatment Performed
Phase 1: Disassembly & Component Removal
Dismantling: Removed the canopy top, corner finials, and bells.
Intrusions Removed: Permanently removed the non-original Rococo foliate carving from the top of the canopy.
Doors: Removed the doors and detached the two misplaced carved motifs for conservation.
Phase 2: Structural Repairs & Glazing Reinstatement
Canopy & Carving: Used targeted paper-stripping to expose the original gesso. Removed poor historic repairs and modern composition fills. Re-carved and replaced missing sections using aged pine.
Discovery & Re-Glazing: Stripping revealed four hidden panels (two per side) where the cabinet was originally glazed. Following consultation with the owner, the modern pine blocking panels were removed. The apertures were re-glazed with sourced historic ripple glass and secured using mahogany beading.
Canopy Alignment: Corrected the fitting of the canopy top. It was refitted flush with the back frame, allowing the cabinet to sit flat against a wall.
Phase 3: Surface Preparation & Re-Gilding
Gesso Stabilization: Papered the cabinet back to its original gesso layer. Applied fresh whitening and gesso putty to damaged areas. recut the repairs to seamlessly match the original carved patterns.
Color Matching: Replicated the original yellow ochre and gold size formulas based on the discovered underlayer samples.
Gilding: Water-gilded the surface using 23¾-carat loose leaf gold. The new gilding was distressed and toned sympathetically to reflect appropriate historic wear.
Phase 4: Interior & Final Assembly
Interior Finish: Stripped away the grey-green overpaint to the original layer. Repainted the interior using a custom-mixed dark green water-based paint to match the original scheme.
Detailing: Re-linked the canopy bells to allow free movement. Reinstalled the two original carved motifs alongside two newly replicated matching motifs in their correct, historical positions on the glazing bars.